How to Remove a Nest Doorbell Safely and Easily
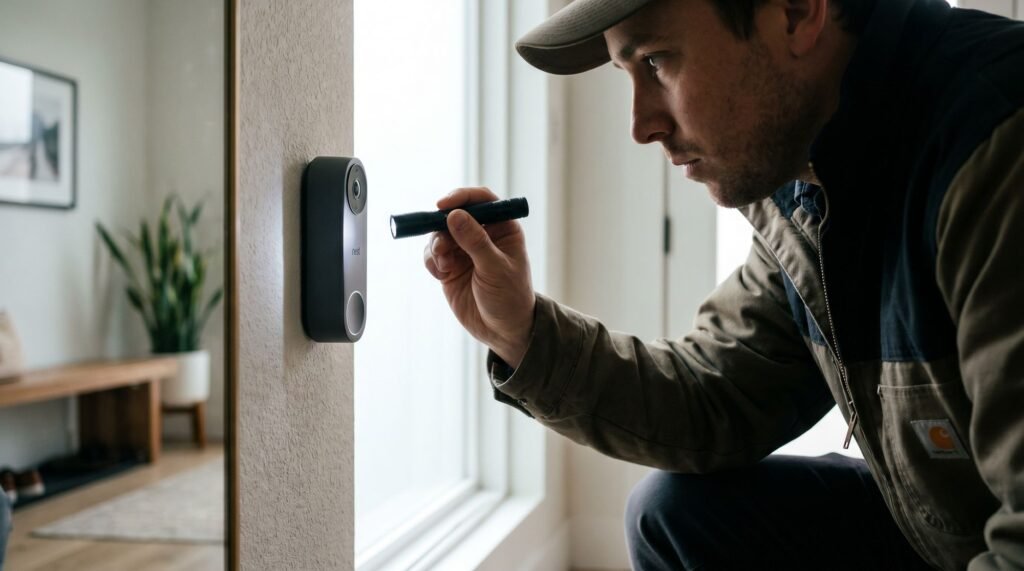
Identifying Your Nest Doorbell Model for Safe Removal Knowing your exact Nest Doorbell model is the single most important step before attempting removal — get it wrong, and you risk cracking the wall plate or snapping the release tab. Google makes two distinct versions: the Nest Doorbell (battery) and the Nest Doorbell (wired). Visually, the battery model is slightly larger and designed to be removed regularly for charging, while the wired version draws continuous power and is meant to stay put longer-term. The practical difference that matters most for removal is where the release mechanism sits. According to Google Support, the release hole on the battery model is located at the top of the unit, while the wired version's release point is at the bottom — a detail that trips up even confident DIYers. A common scenario is moving into a home with an existing Nest Doorbell already installed. In that case, the model isn't always obvious at a glance. Check the back of the device if it's already off, or look up the serial number in the Google Home app under device settings. Forcing the unit off without confirming the model is the primary cause of wall plate damage. Before learning how to remove a Nest Doorbell, take 60 seconds to confirm which version you have. The next step — actually releasing the battery model from its mount — depends entirely on locating that top release hole correctly. Removing the Nest Doorbell (Battery) for Charging Knowing how to remove Google Nest Doorbell battery models is straightforward once you understand the two-part motion — most homeowners complete the process in well under five minutes. The release hole sits at the top of the doorbell unit, not the bottom. This trips up a lot of people who assume the mechanism mirrors a traditional deadbolt or latch. Before anything else, locate that small circular hole along the top edge of the faceplate. From there, the process follows a short, reliable sequence: Insert your release tool (or a straightened paperclip) into the release hole at the top of the unit until you feel slight resistance. Press inward firmly — you should hear or feel a soft click as the locking tab disengages. Pro Tip: Immediately slide the doorbell upward along the mount before pulling. This "push and lift" motion is essential — the unit is designed to travel up the bracket before it clears the mount entirely. Tilt gently outward once the unit has fully cleared the top of the mount. Do not pull the device straight toward you. That's the most common mistake, and it puts unnecessary stress on the mounting bracket and the doorbell's locking tab. According to Doorbell Mount's guidance, a standard wire-free removal takes just 10 to 15 minutes — meaning any resistance you're feeling is a signal to pause and reassess the angle, not apply more force. With the battery model safely in hand, you're ready to charge it and reinstall — or, if you're dealing with a hardwired unit, the removal process involves a few additional steps, starting with your circuit breaker. Uninstalling the Nest Doorbell (Wired) and Chime Connector Knowing how to remove a Nest Doorbell wired model safely comes down to one non-negotiable first step: cutting the power before you touch anything else. Electrical safety is mandatory — not optional. As Wasserstein Home advises, "Before you start taking down your Nest Doorbell… locate your home's circuit breaker and switch off the power." Skipping this step risks electric shock, even on low-voltage doorbell circuits. With the power off, here's how the full removal sequence works: Locate the release hole. On 1st Gen wired models, a small release hole sits on the bottom edge of the unit. Insert the Nest release tool — or a suitable thin alternative — and press firmly to disengage the internal clip. Lift the doorbell free. Once the clip releases, slide the unit upward and away from the mounting plate. Disconnect the wires. Loosen the terminal screws on the back of the unit and carefully pull each wire free. Note which wire connects to which terminal before removing them. Remove the chime connector. Don't forget the small chime connector installed inside your home's doorbell chime box. Unplug it from the chime terminals to fully complete the uninstall. Bold reminder: leaving the chime connector in place can cause your existing chime to malfunction, even after the doorbell is removed. It's a small step that's easy to overlook — and one of the most common mistakes during wired removal. If you don't have the official release tool on hand, don't improvise with a knife or thick screwdriver. The next section covers the safest tool alternatives that won't damage your doorbell's casing. How to Remove a Nest Doorbell Without the Official Tool Losing the proprietary release pin doesn't have to stop you from figuring out how to remove a Nest Doorbell — the right substitute tool makes all the difference. Google confirms that several everyday objects can stand in effectively. The key requirement is simple: whatever you use must be thin enough to reach the internal spring clip seated inside the release port. A tool that's too wide or too rigid will press against the casing instead of engaging the clip, which leads to cracked plastic rather than a clean release. The three most reliable substitutes are: 2.5 mm hex key — The best option for Wired 2nd Gen models, per Google's documentation. Insert it into the top screw port and turn counterclockwise to disengage. Straightened paperclip — A universal fallback that fits the spring-clip port on battery models without requiring any torque. SIM ejection tool — Designed for precision insertion, making it a near-perfect substitute for the original release pin. Caution: Avoid knives, flathead screwdrivers, or thick metal objects. These tools apply uneven pressure and can crack the doorbell's casing or permanently damage the release mechanism. In practice, the paperclip and SIM tool work best when inserted straight and steady — angling the
How to Remove a Nest Doorbell Safely and Easily Read Post »